JENKINS
JENKINS
What is Jenkins ?
Jenkins is a free and open source automation server. It helps automate the parts of software development related to building, testing, and deploying, facilitating continuous integration and continuous delivery. It is a server-based system that runs in servlet containers such as Apache Tomcat.
Differences between Docker and Jenkins
It is absolutely wrong to compare Docker and Jenkins. The ultimate purpose of Docker and Jenkins is entirely different, so you cannot do compare it. Below is the list of things you need to know about Docker and Jenkins.
- Docker is a container engine that can create and manage containers, whereas Jenkins is CI engine that can run build/test on your app.
- Docker is used to build and run multiple portable environments of your software stack. Jenkins is an automated software testing tool for your app. Also, don't forget that Jenkins started as a build tool for Java apps.
- Jenkins provides an easy interface to create and manage multiple CI/CD pipelines using its plugins. Sometimes people build Docker images and run Docker containers using Jenkins CI/CD pipeline for software testing purposes.
- You can easily trigger in-server/in-container deployments based on Chef, Ansible, and Salt using Jenkins CI/CD pipeline.
Here's how Jenkins elements are put together and interact:
- Developers commit changes to the source code, found in the repository.
- The Jenkins CI server checks the repository at regular intervals and pulls any newly available code.
- The Build Server builds the code into an executable file. In case the build fails, feedback is sent to the developers.
- Jenkins deploys the build application to the test server. If the test fails, the developers are alerted.
- If the code is error-free, the tested application is deployed on the production server.
The files can contain different code and be very large, requiring multiple builds. However, a single Jenkins server cannot handle multiple files and builds simultaneously; for that, a distributed Jenkins architecture is necessary.
Jenkins Master-Slave Architecture
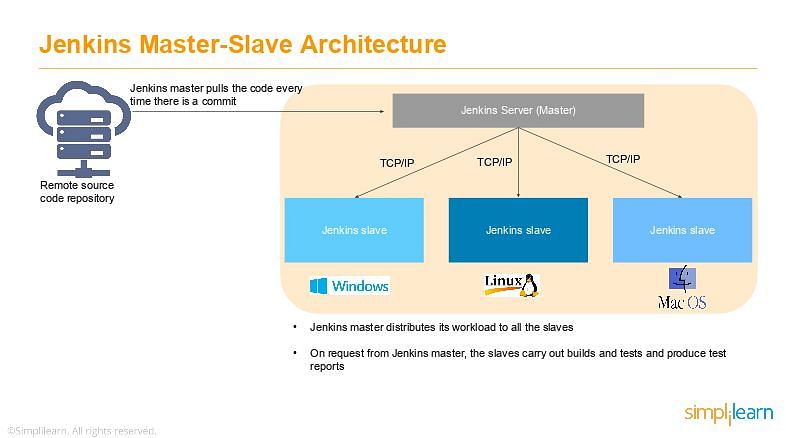
As you can see in the diagram provided above, on the left is the Remote source code repository. The Jenkins server accesses the master environment on the left side and the master environment can push down to multiple other Jenkins Slave environments to distribute the workload.
That lets you run multiple builds, tests, and product environment across the entire architecture. Jenkins Slaves can be running different build versions of the code for different operating systems and the server Master controls how each of the builds operates.
Supported on a master-slave architecture, Jenkins comprises many slaves working for a master. This architecture - the Jenkins Distributed Build - can run identical test cases in different environments. Results are collected and combined on the master node for monitoring.
Integrating Your GitHub Repository to Your Jenkins Project
This blog post was updated in January 2021.
One of the basic steps of implementing CI/CD is integrating your SCM (Source Control Management) tool with your CI tool. This saves you time and keeps your project updated all the time. One of the most popular and valuable SCM tools is GitHub. In this blog I will explain how to integrate Jenkins with GitHub projects.
The integration presented in this blog post will teach you to:
- Schedule your build
- Pull your code and data files from your GitHub repository to your Jenkins machine
- Automatically trigger each build on the Jenkins server, after each Commit on your Git repository
But first, let’s configure the GitHUb and Jenkins integration. Let's begin with the GitHub side!
Configuring GitHub
Step 1: go to your GitHub repository and click on ‘Settings’.
Step 2: Click on Webhooks and then click on ‘Add webhook’.
Step 3: In the ‘Payload URL’ field, paste your Jenkins environment URL. At the end of this URL add /github-webhook/. In the ‘Content type’ select: ‘application/json’ and leave the ‘Secret’ field empty.
Step 4: In the page ‘Which events would you like to trigger this webhook?’ choose ‘Let me select individual events.’ Then, check ‘Pull Requests’ and ‘Pushes’. At the end of this option, make sure that the ‘Active’ option is checked and click on ‘Add webhook’.
We're done with the configuration on GitHub’s side! Now let's move on to Jenkins.
Configuring Jenkins
Step 5: In Jenkins, click on ‘New Item’ to create a new project.
Step 6: Give your project a name, then choose ‘Freestyle project’ and finally, click on ‘OK’.
Step 7: Click on the ‘Source Code Management’ tab.
Step 8: Click on Git and paste your GitHub repository URL in the ‘Repository URL’ field.
Step 9: Click on the ‘Build Triggers’ tab and then on the ‘GitHub hook trigger for GITScm polling’. Or, choose the trigger of your choice.
That's it! Your GitHub repository is integrated with your Jenkins project. You can now use any of the files found in the GitHub repository and trigger the Jenkins job to run with every code commit.
Jenkins - Remote Testing
Web tests such as selenium tests can be run on remote slave machines via the master slave and selenium suite plugin installation. The following steps show how to run remote tests using this configuration.
Step 1 − Ensure your master slave configuration is in place. Go to your master Jenkins server. Go to Manage Jenkins → Manage Nodes.
Step 2 − Click on configure for the DXBMEM30 slave machine.
Step 3 − Ensure the launch method is put as ‘Launch slave agents via Java Web Start’.
Step 4 − Now go to your slave machine and from there, open a browser instance to your Jenkins master instance. Then go to Manage Jenkins → Manage Nodes. Go to DXBMEM30 and click on
Step 5 − Click on the DXBMEM30 instance.
Step 6 − Scroll down and you will see the Launch option which is the option to Start ‘Java Web Start’.
Step 7 − You will be presented with a Security Warning. Click on the Acceptance checkbox and click on run.
You will now see a Jenkins Slave window opened and now connected.
Step 8 − Configuring your tests to run on the slave. Here, you have to ensure that the job being created is meant specifically to only run the selenium tests.
In the job configuration, ensure the option ‘Restrict where this project can be run’ is selected and in the Label expression put the name of the slave node.
Step 9 − Ensure the selenium part of your job is configured. You have to ensure that the Sample.html file and the selenium-server.jar file is also present on the slave machine.
Once you have followed all of the above steps, and click on Build, this project will run the Selenium test on the slave machine as expected.
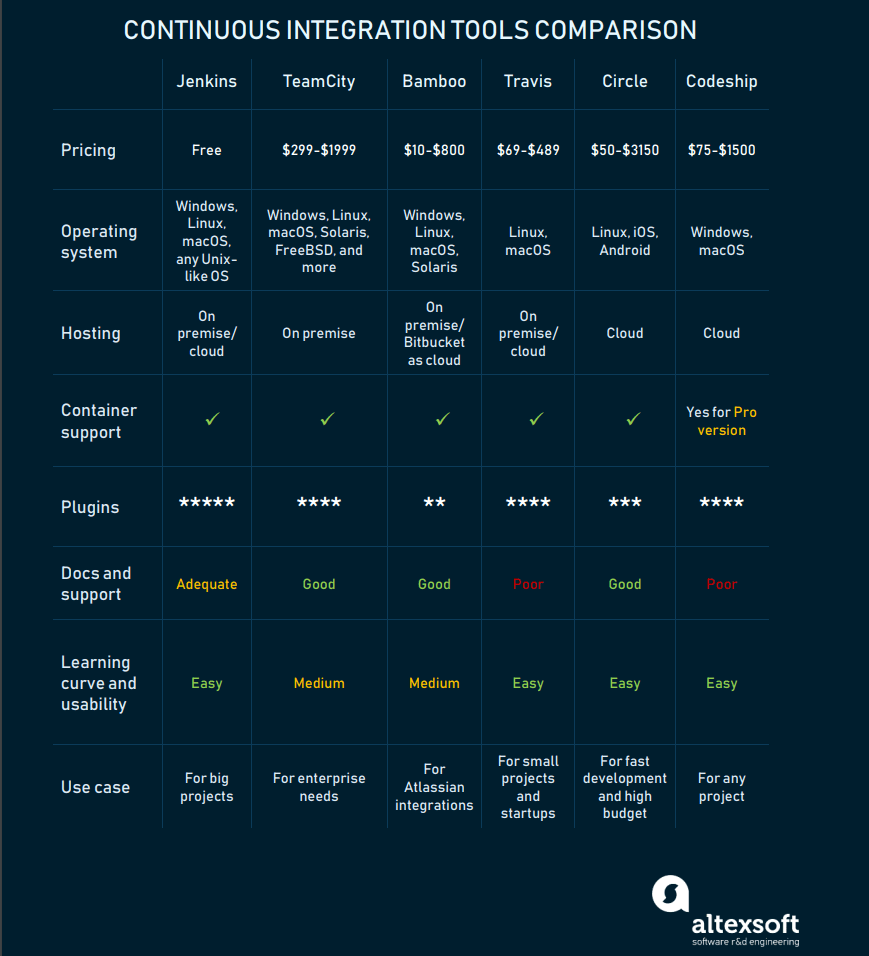
CONTINUOUS INTEGRATION OF VARIOUS TOOLS
Jenkins: the most widely adopted CI solution
Jenkins is an open-source project written in Java that runs on Windows, macOS, and other Unix-like operating systems. It’s free, community-supported, and might be your first-choice tool for continuous integration. Primarily deployed on-premises, Jenkins can run on cloud servers as well. Its integrations with Docker and Kubernetes take advantage of containers and perform even more frequent releases.
Main selling points
No expenses required. Jenkins is a free CI tool and that can save you money on the project.
Limitless integrations. Jenkins can integrate with almost any external program used for developing applications. It allows you to use container technology such as Docker and Kubernetes out-of-the-box. G2 Crowd reviewers claim: “No better tool exists for integrating your repositories and code bases with your deployment infrastructure.”
A rich library of plugins is available with Jenkins: Git, Gradle, Subversion, Slack, Jira, Redmine, Selenium, Pipeline, you name it. Jenkins plugins cover five areas: platforms, UI, administration, source code management, and, most frequently, build management. Although other CI tools provide similar features, they lack the comprehensive plugin integration that Jenkins has. Moreover, the Jenkins community encourages its users to extend the functionality with new features by providing teaching resources.
Active community. The Jenkins community provides a guided tour to introduce the basics and advanced tutorials for more sophisticated use of the tool. They also hold an annual conference DevOps World | Jenkins World.
Distribution of builds and test loads on multiple machines. Jenkins uses a Master-Slave architecture, where master is the main server that monitors slaves – remote machines used for distributing software builds and test loads.
Main weaknesses
Documentation isn’t always sufficient. For instance, it lacks info on pipelines creation. This adds time-consuming tasks to the list, as engineers have to work through them.
Poor UI. Its interface seems a bit outdated as it doesn’t follow modern design principles. The absence of whitespaces makes the views look crowded and confusing. A lot of the progress features and icons are super pixelated and don’t refresh automatically when jobs finish.
It takes manual effort to monitor the Jenkins server, and its slaves, to understand interdependencies among the plugins, and to upgrade them from time to time.
All in all, Jenkins serves best for big projects, where you need a lot of customizations that can be done by usage of various plugins. You may change almost everything here, still, this process may take a while. However, if you are planning the quickest start with the CI system, consider different options.
Comments
Post a Comment